IBM i Access Client Solutions (ACS) – Deployment Methods and Deployment Wizard
IBM i Access Client Solutions is a very powerful tool — and that’s exactly the problem. When you roll out IBM i Access Client Solutions (ACS) to your organization, handing every user the default, wide-open application is a massive security risk. Right out of the box, ACS hands your users Data Transfer, Remote Command, IFS browsing, Printer Output, Operations Console, and more.
The same tool your DBAs use to run SQL scripts also gives a curious operator more IBM i reach than you’d ever approve in a formal access request. And in regulated industries — banking, insurance, capital markets — that kind of unchecked client-side access is a compliance red flag waiting to become an audit finding.
To maintain a secure, audit-ready environment, you must take control of the ACS client. One file changes everything: acsconfig.properties. You can achieve mastering IBM i ACS deployment methods by understanding available IBM ACS deployment options and AcsConfig.properties deployment configuration files.
Here is your step-by-step technical guide to locking down ACS, enforcing secure connections, and stripping away unnecessary features before the client ever reaches the end-user. This is exactly what you need if you’re deploying ACS across multiple users or systems.
This guide breaks down exactly how to use it to enforce feature restrictions, lock in default connections, and push security policies across every ACS installation in your environment. If you haven’t read the IBM i Access Client Solutions overview yet, start there first — then come back here to understand about IBM ACS deployment mehtods.
Table of Contents
What are the different ways to deploy ACS to users?
IBM i Access Client Solutions offers a wide range of deployment methods, from simple manual extractions to advanced, centrally managed enterprise configurations. As a Java-based, platform-independent application, it can be deployed on Windows, Mac, Linux, and even natively on the IBM i Integrated File System (IFS).
The primary deployment methods are categorized as follows:
| Deployment Option | Method | Description |
| Scripted Installation Options | Local and User Customized | The script copies product files from a central location to the local PC (e.g., <user_home>\IBM\ClientSolutions on Windows). In this scenario, the end-user decides which functions to enable during the initial setup prompts. |
| Local and Admin Customized | The script copies files to the local PC, but an administrator pre-configures the installation. By running the script with the /AdminConfig parameter at a central location first, the administrator restricts functions and sets defaults, which are then enforced when users run the script from their workstations. | |
| Remote and Admin Customized | This advanced option maintains product files in a shared central location (like a network share or the IBM i IFS) and does not copy them to the workstation. Desktop shortcuts and file associations point directly to the remote files. This method simplifies updates, as updating the central location automatically propagates changes to all users upon restart | |
| Specialized Deployment Methods | Multi-User PC Deployment: | For shared workstations on Windows, specialized scripts (e.g., install_acs_64_allusers.js) install the application into a public folder (\Users\Public\IBM\ClientSolutions), making it available to all users of that machine. |
| Silent Installation | For automated mass deployments, administrators can use /AdminConfig to pre-set features and the /Q (Quiet) parameter to suppress all user prompts, including the End-User License Agreement (EULA). | |
| Portable Media | ACS can be extracted to and run directly from USB flash drives, CDs, or DVDs. By using the {PRODUCTDIR} keyword in AcsConfig.properties, administrators can ensure the user’s configuration is also stored on the portable media, allowing them to carry their settings between different PCs. | |
| Native IBM i Deployment | Command-line plugins that do not require a GUI (such as Data Transfer) can be extracted to the IBM i IFS and run natively on the server. | |
| Manual and Automated Configuration Methods | Simple Unpacking | Users can choose to simply extract the .zip file to any location where they have read authority, including local disks or network drives. |
| Automatically Imported Configurations | Administrators can propagate specific settings (systems, emulation sessions, etc.) by exporting a master configuration to a file (like acs_bak.zip) and using the com.ibm.iaccess.autoimport property in the AcsConfig.properties file to push settings to users at startup. | |
| IBM i Update Location | Once deployed, ACS can be configured to check a central IBM i IFS location for updates. Users can then install these updates with a single click from the “Check for Updates” menu or via an automated plugin. |
The Deployment Strategy

Deployment Strategy 1: Local Installation
Local installation within the IBM i Access Client Solutions framework refers to a deployment strategy where product files are placed and stored on the workstation’s local hard disk drive. This approach is primarily facilitated by platform-specific installation scripts—such as install_acs_xx.js for Windows, install_acs for Mac, and install_acs_xx for Linux—which automate the process of copying files, creating desktop shortcuts, and setting file associations.
Core Local Installation Strategies
The sources categorize local installation into two primary administrative options based on who controls the available features:
| Local and User Customized (Option 1) | This is an “admin-light” approach where the administrator provides the installation scripts in a central location, but the end-user decides which functions (such as 5250 emulation or Data Transfer) to enable through prompts during the initial setup. |
| Local and Admin Customized (Option 2) | To enforce organizational standards, an administrator can pre-configure the local installation using the /AdminConfig parameter on the installation script. This allows the administrator to restrict specific functions; when the user subsequently runs the script, the product files are copied locally, but the administrator’s pre-selected settings are enforced, and the user is not prompted to choose features. |
Operational Highlights and Benefits
The defining characteristic of a local installation is its independence from the network once the initial deployment is complete.
- Offline Availability: Because all necessary files reside on the local disk, the workstation does not need to be connected to a remote network share to start or run ACS.
- Performance: Local installations provide consistent performance because the workstation does not have to wait for files to be retrieved over a network, though the sources note that “Remote” installations use caching to achieve similar speeds after the initial launch.
- Multi-User Capability: On Windows, local installation can be extended to all users of a single PC by using “allusers” scripts (e.g.,
install_acs_64_allusers.js), which deploy the files to the \Users\Public\IBM\ClientSolutions folder.
Multi-user PC installation
A multi-user PC installation is a specialized form of local deployment for IBM i Access Client Solutions (ACS) designed to make the product available to all users of a single Windows workstation. While standard local installations are often targeted at single users, this “advanced” option uses public directories to ensure shared access.
| Deployment to the Public Folder | On Windows systems, this deployment is facilitated by specific scripts located in the Windows_Application folder of the ACS package. | Installation Scripts: Administrators use install_acs_32_allusers.js or install_acs_64_allusers.js depending on the system’s architecture.Storage Location: Unlike single-user installs that copy files to the user’s home directory (e.g., %HOMEPATH%\IBM\ClientSolutions), a multi-user install places the application files in the \Users\Public\IBM\ClientSolutions folder.Accessibility: This process places an “Access Client Solutions” icon on the public desktop, making the product visible and launchable for any user who logs into that PC. |
| Administrative Requirements and the EULA | A critical distinction of the multi-user local installation is how the End-User License | Default Behavior: Even though the files are in a public folder, the system typically prompts each individual user to accept the EULA the first time they start the application. Global Acceptance: To streamline the experience, an administrator can accept the EULA on behalf of all users. This must be done from an elevated command prompt (Run as administrator) using a Windows administrator ID that has not yet accepted the EULA. Process for Global Acceptance: The administrator must navigate to the public installation directory ( \Users\Public\IBM\ClientSolutions) within the elevated prompt and launch the product executable (e.g., acslaunch_win-64.exe). Once the EULA is accepted in this elevated state, no other users on that machine will be prompted. |
| Maintenance and Updates | As a form of local installation, the multi-user deployment requires manual intervention for updates. | Updating: When a new version of ACS is released, an administrator must re-run the “allusers” installation scripts on the PC to overwrite the files in the public folder with the updated version. Uninstallation: To remove the application, the uninstall_acs.js script found in the same Windows_Application folder can be used to delete the public product files, desktop icons, and file associations |
The Larger Context: Comparison and Trade-offs
Local installation exists alongside more specialized or centralized deployment options, each offering different maintenance profiles:
- Update Burden: The primary trade-off for a local installation is the manual effort required for updates. When a new version of ACS is released, the installation script must be re-run on every individual workstation to copy the updated files.
- Contrast with Remote Deployment (Option 3 (Let’s discuss it later)): In a “Remote and Admin Customized” deployment, product files are kept on a central server (like a network share or the IBM i IFS) and are never copied to the PC. The main advantage here is that updates are applied once at the central location and automatically propagate to users, whereas local installs require per-machine updates.
- Portable and Native Alternatives: Beyond standard local or remote setups, ACS can be run directly from portable media (like a USB drive). Additionally, some command-line plugins can be deployed natively on the IBM i Integrated File System (IFS) to run tasks directly on the server without involving a PC at all.
- Custom Local Locations: While the scripts use default paths (like
/Applicationson Mac or%HOMEPATH%\IBM\ClientSolutionson Windows), users can also manually unpack the ACS .zip file to any custom location. However, simply unpacking the zip file does not automatically create desktop icons or file associations unless specific administrative steps are taken.
Deployment Strategy 2: Advanced Deployment
Advanced deployment of IBM i Access Client Solutions moves beyond simple standalone installations to focus on centralized administration, scalability, and strict control over user environments. While a basic deployment (Option 1) allows users to decide which functions to install, advanced strategies utilize the Deployment Wizard (/AdminConfig) to pre-configure software at a central location before it ever reaches the user’s PC.
Advanced Deployment Options
The sources define two primary advanced strategies designed to simplify large-scale management:
| Option 2 | Local and Admin Customized | The administrator pre-selectes available functions and configuration defaults at a central location. When users run the installation script, the product files are copied to their local PC, but the administrator’s settings are enforced, and the user is not prompted for feature selection. |
| Option 3 | Remote and Admin Customized | In this enterprise-level approach, product files are maintained solely on a shared central location (like a network share or the IBM i Integrated File System) and are never copied to the local PC. Desktop shortcuts and file associations point directly to the remote source. |
Advanced deployment drastically simplifies product maintenance by centralizing updates:
- Automated Remote Updates: For Remote Deployment (Option 3), updates are applied once at the central location. Users receive the updated version automatically the next time they restart ACS.
- Configured Update Locations: Administrators can designate an IBM i system as a central update server by setting the
com.ibm.iaccess.CheckUpdateSystemproperty. Users can then click “Check for Updates” in the ACS GUI to automatically download and install updates from the server. - Configuration Propagation: Using the
com.ibm.iaccess.autoimportproperty, administrators can automatically push out pre-set system configurations, emulation sessions, and preferences. When the administrator increments the version number of the exported configuration, ACS automatically imports the new settings at user startup.
Native and Specialized Scenarios
Advanced deployment also includes Native IBM i Deployment, where command-line plugins (such as Data Transfer) are extracted to the IFS and run directly on the IBM i OS. This allows for automated, headless tasks that do not require a separate PC. Furthermore, for environments requiring specific Java versions, administrators can bundle a customized Java Runtime Environment (JRE) directly with the ACS product files at the central location to ensure a consistent, tested environment across all workstations.
The Deployment Wizard (/AdminConfig)
The Deployment Wizard, invoked using the /AdminConfig parameter with the product’s installation scripts, serves as the primary administrative tool for pre-configuring IBM i Access Client Solutions (ACS) before widespread distribution. It was specifically introduced to help administrators answer two critical questions: how to restrict specific functions from users and what the best method of delivery is for their unique environment
It allows administrators to:
- Global Configuration: Pre-set the deployment type (local or remote).These customizations are saved into the AcsConfig.properties file at the central location. Any future installations performed from that central source will automatically inherit these settings
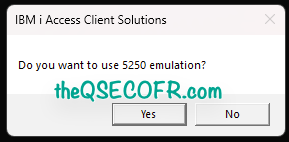
- Feature Control: Include or exclude specific features like 5250 emulation, Data Transfer, or Console tasks to ensure users only see necessary functions.
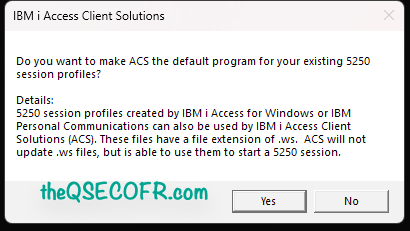
- Default File Associations: Set default file associations, such as taking over
.wsprofiles from legacy applications.
Administrative and Platform Considerations
While the /AdminConfig wizard is currently only supported on Windows deployment scripts, the resulting configuration file (AcsConfig.properties) can still be used to deploy customized versions to Mac and Linux users.
Furthermore, once a deployment has been customized via the wizard, any user attempts to bypass these restrictions using parameters like /Reset or /Exclude will be ignored, as the administrator’s configuration takes precedence. To maintain these settings during product updates—which typically overwrite the properties file—administrators must use the /AdminRestore parameter to recover their saved configuration from the AcsConfig_save.properties file created by the wizard
Role within Deployment Options
The wizard is essential for moving beyond basic single-user installations to more controlled, enterprise-ready strategies. It facilitates the following primary deployment paths:
- Option 2: Local and Admin Customized
- Option 3: Remote and Admin Customized
Deployment Wizard/AdminConfig
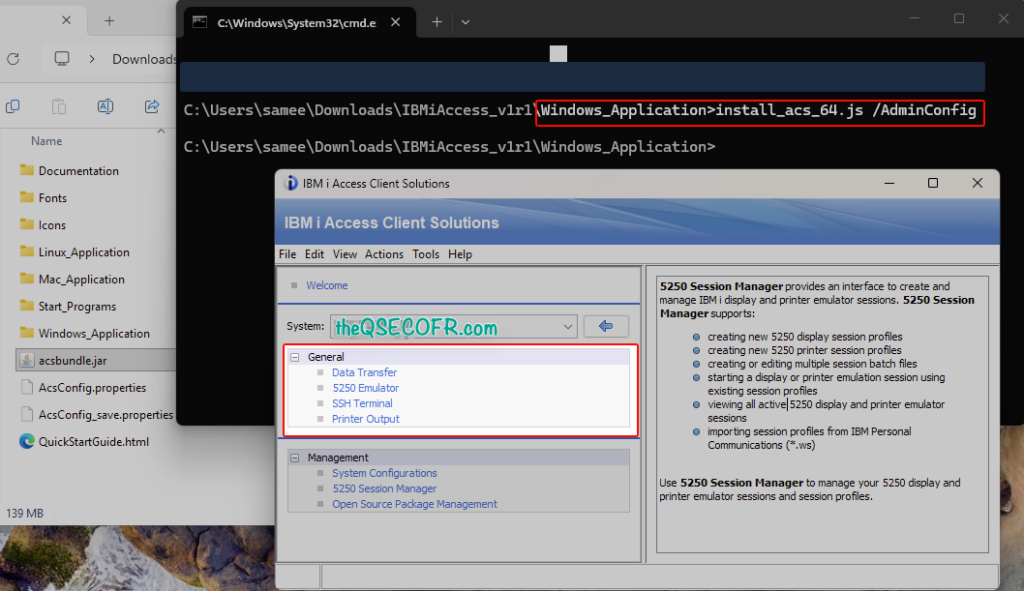
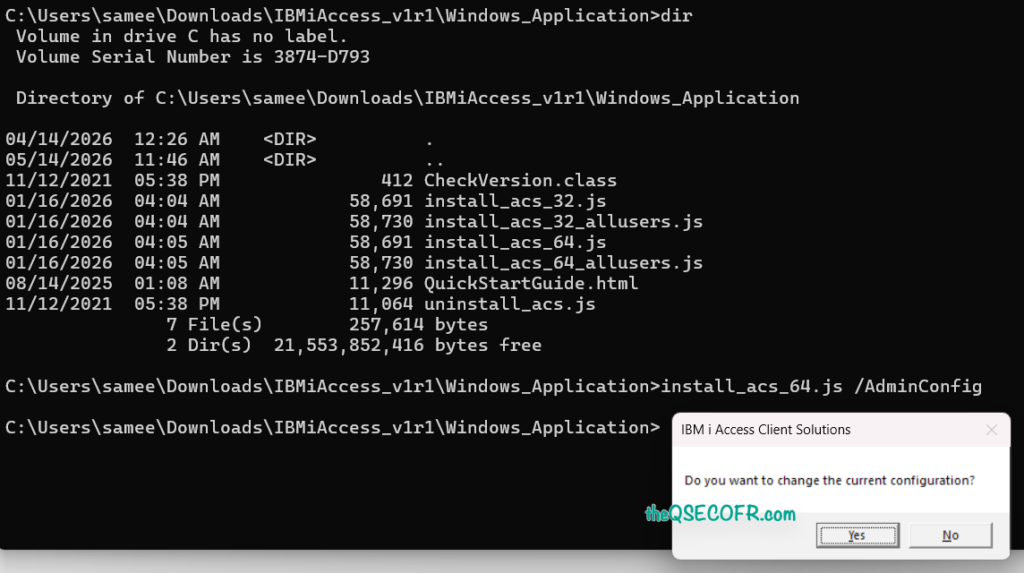
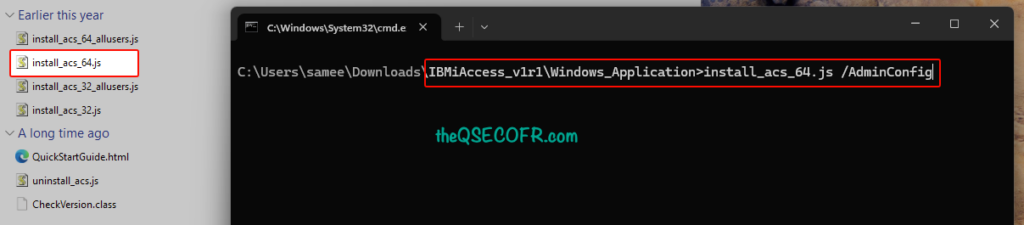
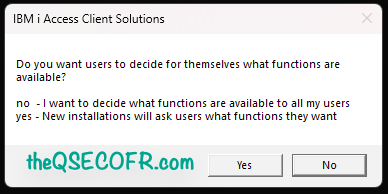
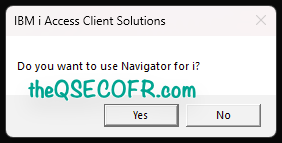
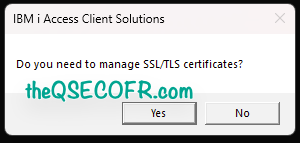
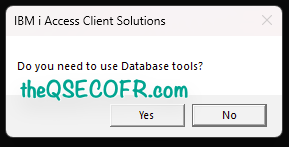
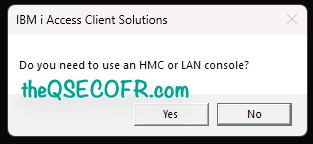
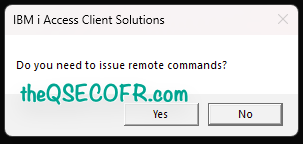
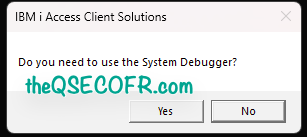
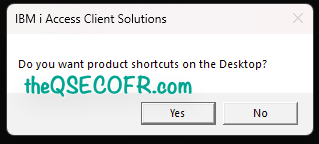
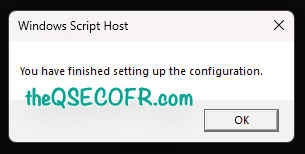
For an Administrator to create a custom deployment, they can execute the install_acs_xx.js /AdminConfig command. This command records the responses and updates the AcsConfig.properties file within the deployment files. It is advisable to stage this deployment on a centralized location, such as a network drive/share or IBM i IFS directory that all users have access to. When the /AdminConfig parameter is used, the wizard will be displayed. The screens and options presented to the Administrator are as follows:
- Deploy using the
<path>\Windows_Application\install_acs_32.js /AdminConfigcommand will start the deployment wizard. This will create a customized deployment for your users.
- Click Yes to proceed with the change to the current configuration. Clicking No will end the deployment wizard.

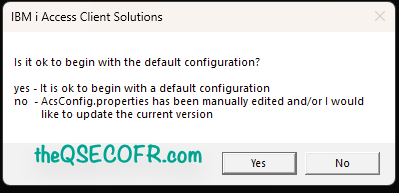
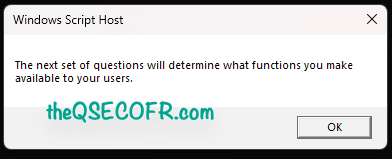
- Click Yes to start with a default version of AcsConfig.properties. If you have previously edited AcsConfig.properties to add your own customizations (let’s discuss about this later), those changes will be lost and you need to add them back when /AdminConfig has finished.
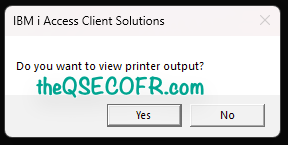
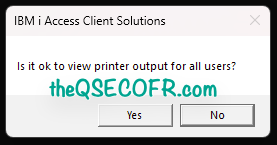
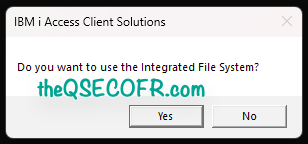
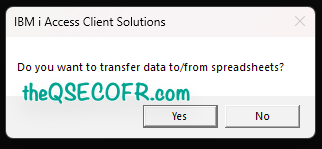
This step could take a minute, depending on the speed of your file system. A command prompt might appear for a minute or two. Be patient, it will eventually continue. Accept and configure further steps depend on your requirements. Below are screen captures that show which features and options you can customize during this wizard.
These things are also discussed in IBM’s IBM i Access Client Solutions: Customization and Deployment
If in case you need different feature set for another ACS deployment, then run one of the /Windows_Application deployment scripts with the parameter /AdminConfig again.
As an example,
- one configuration for IBM i operator who needs only basic operation functions such as printer outputs, data transfer and 5250 emulator.
- Another configuration setup for a use require DB functions such as 5250 emulator, printer outputs, data transfers, database tools, etc.
Once the you finish the configuration wizard and custom deployment is created, you have two options for users to deploy the product:
- Local on the PC
- Remote from a network drive/share or IBM i IFS directory
| Local System Deployment: | 1. The product files will be copied from the central location to the local PC. 2. To apply product updates to the PC, the install_acs_xx.js script needs to be run again. 3. The remote location does not need to be available to start the product because all product files are available locally on the PC. |
| Shared Local Deployments: | 1. Admin creates the deployment file and rebundles them and puts them to the same location on each users PC. 2. The files reside on the local users pc. 3. The deployment is run from the local users pc. (either by the user or by script etc) 4. Updates are updated locally on each users pc. (ie copy ascbundle.jar and replace the one on each users pc. ***Since all files are copied to the same location on the users pc, pushing updates is not a problem and the users won’t have any network latency issues. |
| Shared Remote Deployments: | Users need to connect to the remote location to start the product. 2. The files only reside at the central location and are never copied to the local pc. 3. Updates and configuration changes are picked up automatically by stopping and restarting the IBM i Access Client Solutions. 4. The remote location must be available to all users to start the product. |
Applying Updates
| On Local System Deployment | Updates are applied by calling the install_acs_xx.js script again just like the previous option. However, for this type of deployment, there is one extra step to be performed by the administrator. When customizing the product using the /AdminConfig parameter, these customizations were written to the AcsConfig.properties file in the product’s root directory. When the administrator updates the product files with a new version by extracting the contents of the new version on top of the existing files, by default, the AcsConfig.properties file will get overwritten with a shipped default version. This means that your existing customizations will be lost. The best way to address this is to first save the AcsConfig.properties file, extract the updated files on top of the existing, and replace the AcsConfig.properties file with the one you saved off. |
| On Remote System Deployment | The key advantage to this type of deployment is that when the administrator updates the product at the central location or decides to change the function availability, the install_acs_xx.js script does not need to be run again to pick up the updates. This is because the Desktop shortcuts and file associations are already pointing to the updated files at the central location. However, similar to the previous option, the administrator has one more step after updating the product files because the AcsConfig.properties file would have been overwritten with a shipped default version. Adminstrators need to make sure they save the AcsConfig.properties file, extract the updated files on top of the existing, and replace the AcsConfig.properties file with the one that was saved off. |
Installation
use install_acs_xx.js or install_acs_xx_allusers.js to install on local system deplyoment.
install_acs_32.js orinstall_acs_64.js should match the bitness of Java installed on the PC- It is recommended that the bitness of Java match the bitness of the PC OS
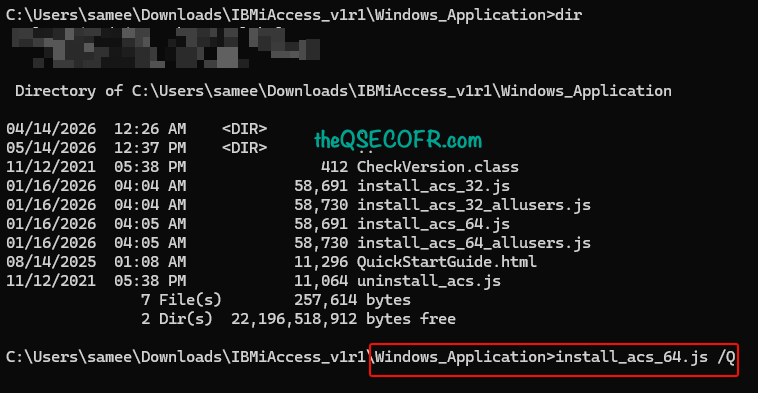
For mass deployment, administrators can combine /AdminConfig with the /Q(Quiet) parameter to perform silent installations. This suppresses all interaction, including the End-User License Agreement (EULA), providing a seamless background installation for the end-user. This only applies to a deployment image that has been modified with /AdminConfig.
In our next post, we’ll explore how we can leverage function restrictions features to control ACS access for users with both local and remote deployment options to harden the product.
Granular Function Restrictions
In advanced scenarios, administrators have multiple layers to restrict access:
- AcsConfig.properties: Using
ExcludeCompsorIncludeCompsto disable features globally. - The Restrictions Tab: When ACS is run as a Windows Administrator, a “Restrictions” tab appears in Preferences, allowing settings to be stored in the Windows Registry; these can then be exported as
.regfiles for mass distribution. - IBM i Side (WRKFCNUSG): Access can also be restricted on the server side using Function Usage IDs, ensuring that even if a user bypasses local restrictions, they lack server authority for specific ACS functions.
Read Next part of this blog post here